The future is Post-Quantum. Unfortunately, post-quantum cryptography is larger, especially the signatures. How much room is there in TLS? I had a look.
Category: General
demandimport: load python modules on-demand
A typical python app starts with lots of imports of modules which are not always used. Usually this isn’t a problem. However, if you are writing a commandline-util in Python which should be snappy, every fraction of a second counts. Mercurial, the SCM written in Python, loads its modules on-demand to be snappy. I took their code and packaged it into a separate module demandimport such that everyone can use it for their own command-line utils.
Its use is simple:
import demandimport; demandimport.enable()
You can find demandimport on github.
Use MacPort’s ssh-agent
The version of ssh that ships with Mac OS X is quite old. If you want a more recent version to use, for instance, ECDSA or ED25519 keypairs you can install a more recent version of ssh using MacPorts with sudo port install openssh +gsskex.
Unfortunately, OS X won’t remember your fancy ECDSA or ED25519 key passwords in the KeyChain. This is because the old ssh-agent is running in the background. This is how to run MacPort’s ssh-agent:
- Don’t forget to install
opensshwith the+gsskexvariant. Otherwisessh-agentwon’t even try to talk to the KeyChain. - Run
launchctl unload -w /System/Library/LaunchAgents/org.openbsd.ssh-agent.plistto disable Mac’s oldssh-agent. Note: run this under your user account — not as root. - Copy
/System/Library/LaunchAgents/org.openbsd.ssh-agent.plistto~/Library/LaunchAgents/org.macports.ssh-agent.plistand open the copy in an editor. In the copy, replace/usr/bin/ssh-agentwith/opt/local/bin/ssh-agentandorg.openbsd.ssh-agentwithorg.macports.ssh-agent. - Run
launchctl load -S Aqua -w ~/Library/LaunchAgents/org.macports.ssh-agent.plistto enable thessh-agentfrom MacPorts. Again, run this as under your user account — not as root. - Logout and login again.
That should do it. These steps are an updated version of this guide.
Setup Ubuntu IPv4/IPv6 router for VLAN-tagged PPPoE internet connection
My ISP, XS4ALL, delivers IPv4/IPv6 over fiber via VLAN-tagged PPPoE. Normally, you would use the (excellent) WiFi-router they lend you, but if you want a little more control you can install your own computer as router. In this post I will explain how to do this with Ubuntu 15.04. Some steps are specific to my ISP, but most of it will also apply to any other provider using PPPoE.
Rename interfaces
The router should have at least two interfaces: one to connect to the fiber-modem and the other for the LAN. It is convenient to rename the interfaces. Create a file /etc/udev/rules.d/10-persistent-network-names.rules containing
SUBSYSTEM=="net", ACTION=="add", KERNEL=="em1", ATTRS{address}=="12:34:45:67:89:0a", NAME="modem"
SUBSYSTEM=="net", ACTION=="add", KERNEL=="eth0", ATTRS{address}=="12:34:45:67:89:0a", NAME="modem"
SUBSYSTEM=="net", ACTION=="add", ATTRS{address}=="0a:89:67:45:23:12", NAME="lan"
Replace the MAC addresses by the corresponding MAC addresses of your interfaces (you can find them using ifconfig | grep HWaddr) and em1 by the current name of the interface connected to the modem. Note that we have two rules for the modem interface: this is to prevent udev form renaming the VLAN interface. If you know a nicer way, please let me know. Reboot and test whether this worked.
Configure interfaces
Add the following to /etc/network/interfaces
auto modem
iface modem inet manual
    mtu 1508

auto modem.6
iface modem.6 inet manual
    vlan-raw-device modem
    mtu 1508

auto lan
iface lan inet static
    address 10.0.0.1
    netmask 255.255.255.0

auto wan
iface wan inet ppp
    pre-up /bin/ip link set modem.6 up
    provider xs4all

iface wan inet6 auto
The block for modem is only used to set its MTU to 1508. We need this if we want to set the MTU of the PPPoE connection to the normal 1500 (and compensate for the 8 bytes PPPoE uses). If you run into trouble, you can leave all MTU declarations out.
The block modem.6 configures an interface for packets on modem tagged with VLAN ID 6. XS4ALL uses VLAN tagging such that it can deliver different services (internet on 6, TV on 4, …) via the same modem.
The block lan sets up the interface for a LAN on 10.0.0.x.
Finally, the wan block tells the system to set-up a PPP-interface using the configuration named xs4all. We will set that up in a moment.
Set-up PPPoE
Install the package pppoe and create /etc/ppp/peers/xs4all with the contents
ifname wan
noipdefault
+ipv6 ipv6cp-use-ipaddr
defaultroute
connect /bin/true
noauth
persist
mtu 1500
mru 1500
noaccomp
default-asyncmap
plugin rp-pppoe.so modem.6
user "someuser@xs4all.nl"
Also create /etc/ppp/chap-secrets with
"someuser@xs4all.nl" * "somepassword"
My ISP requires the authentication step, but (intentionally) does not check the username and password — you can fill in anything you like.
Reboot. You should have IPv4 on the router. (The rest: DNS, IPv6, IPv4 on the LAN shouldn’t work.)
LAN
We’re ready to set up the LAN. We will use dnsmasq as it will act as (caching) DNS server, DHCP server and RA (IPv6’s alternative to DHCP) server. Install dnsmasq and write the following to /etc/dnsmasq.conf
domain-needed
bogus-priv
filterwin2k
resolv-file=/etc/resolv.conf-dnsmasq
local=/lan/
expand-hosts
domain=lan
interface=lan
dhcp-range=lan,10.0.0.50,10.0.0.150,255.255.255.0,12h
dhcp-option=tag:lan,option:router,10.0.0.1
dhcp-authoritative
enable-ra
dhcp-range=::1,constructor:lan,ra-stateless,ra-names,12h
In /etc/resolv.conf, put:
nameserver 10.0.0.1
You might want to remove the package resolvconf as it might interfere. Now, in /etc/resolv.conf-dnsmasq, put the actual DNS server you would like to use. For Google’s public DNS, write:
nameserver 8.8.8.8
We’re almost done with the IPv4 LAN. To /etc/sysctl.conf append
net.ipv4.ip_forward=1
net.ipv6.conf.all.forwarding=1
This will allow the kernel to forward packages between all interfaces. If you have more interfaces, you might want to restrict the forwarding to lan and wan, but to configure this requires running a script at the creation of the interfaces.
And finally, install iptables-persistent and write to /etc/iptables/rules.v4, the following for the IPv4 NAT:
*nat
:POSTROUTING ACCEPT [0:0]
-A POSTROUTING -o wan -j MASQUERADE
COMMIT
Note that this will allow any connections from outside to the router on any port. Also, without configuration ip6tables, no connection is blocked form the outside. If you like a firewall (that is: whitelist which connections are allowed), you want to add some rules here.
Reboot. You should have IPv4 & DNS on the router and LAN.
IPv6
My ISP assigns a /48 via DHCPv6. Install wide-dhcpv6-client. Change /etc/wide-dhcpv6/dhcp6c.conf to
profile default
{
  script "/etc/wide-dhcpv6/dhcp6c-script";
};

interface wan {
    send ia-pd 0;
};

id-assoc pd 0 {
   prefix-interface lan {
       sla-len 16;
       sla-id 0;
       ifid 1;
   };
};
This will request a subnet and assign it to the lan interface. The IP of the router will be thesubnet::1 due to the ifid setting.
That’s it: reboot and enjoy your IPv4 & IPv6 connection.
msgpack for pypy
msgpack is a fast and small binary format for json. The Python msgpack module is even a drop-in replacement for the json module.
PyPy is an implementation of Python in Python with a tracing JIT. If your Python script runs for more than 1 second, it will probably be quite faster on PyPy.
PyPy is almost a drop-in replacement for Python. Only extensions modules written in C can be a problem — for instance the msgpack module.
Thus I wrote a pure Python fallback for the msgpack module, which has been merged upstream. As a rough benchmark, I measured the pack and unpack time of a 30MB msgpack-object from the wild.
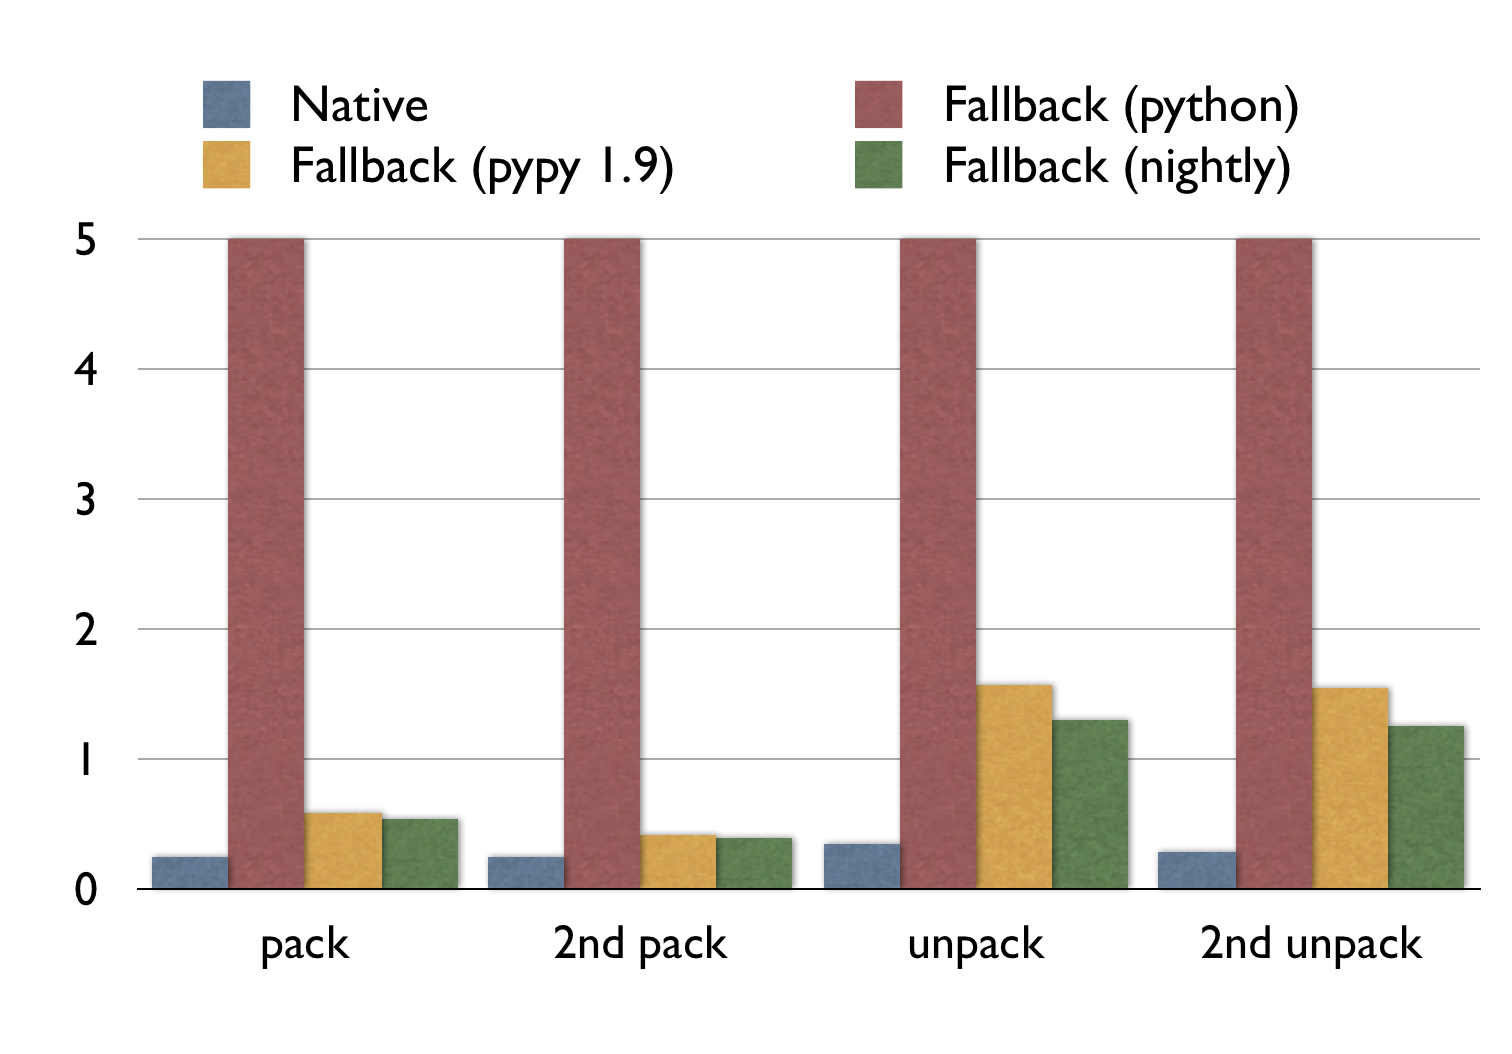
Note that:
- The execution times for the fallback with normal Python are all off the chart (15.4s, 15.1s, 10.1s, 10.0s).
- PyPy is faster on the second run: it had time to trace and optimize at runtime.
- For packing, PyPy (nightly) is almost as fast as the original C extension.
- For unpacking, PyPy (nightly) is 340% slower. Yet it more than 10 times faster than normal Python.
This code should be in the next official release of msgpack-python. If you want to use it already, check out the git repository.
The first version did not run this fast on PyPy. With PyPy’s jitviewer the compiled code and assumptions of PyPy can be examined. These are the tweaks I used in descending order of impact.
- Instead of
StringIO, the fallback uses PyPy’s ownStringBuilder.StringIOallows writing, reading, seeking and what more.StringBuilderonly allows appending and thus it is easier for PyPy to optimize. This increased performance of packing by an order of magnitude. - Using constant format strings for
struct.unpackallows PyPy to optimize it. Thusstruct.unpack("I", f.read(4)); f.read(n)instead ofstruct.unpack("I%ds"%n, f.read(4+n)) - Using
stream.write(a); stream.write(b)instead ofstream.write(a+b)increased performance. - Adding an explicit fastpath
- PyPy usually specializes a function well for its most common path, however in some cases it needs help. In this case a function returns a concatenation of several strings. However: in the most common case it only does one:
ret=''; ret+=something; return ret. PyPy does not recognize thatretis not needed at all in this case, so I added an if-statement before initializing it for the case where there is only one concatenation.
Clearly the unpacking code could be faster, if anyone with expertise on PyPy’s JIT would look at it, that would be great.
PyPy 2.0-beta1 for Debian Squeeze amd64
I compiled PyPy 2.0-beta1 for Debian Squeeze amd64.
FTL .dat packer and unpacker
Fix excessive disk usage of Sparrow for Mac
It may happen that Sparrow for Mac uses an excessive amount of disk space. For only the headers of my 9GB of e-mail, Sparrow used 39GB. I found a work-around.
The problem
Sparrow uses a Tokyo Cabinet, called data.tch, as storage. Mine was 39GB. What could eat up all that space? I only have 9GB of e-mail in total. With a simple script I looked into the cabinet and found it actually contained less than 1GB of data. The cabinet was wasting a lot of space by not being packed tightly.
The work-around
To repack the Tokyo Cabinet, run:
tchmgr optimize "~/Library/Containers/com.sparrowmailapp.sparrow/Data/Library/Application Support/Sparrow/(your-email@gmail.com).sparrowdb/data.db/data.tch"
Replace (your-email@gmail.com) with your e-mail address. You can install the tchmgr program using sudo port install tokyocabinet, if you are a MacPorts user.
This reduced the size of the cabinet to 1.1GB!
Cause?
It is odd that the cabinet became so loosely packed. It may happen if Sparrow adds and removes a lot of entries, but there seems no reason for Sparrow to do this. There might be an underlying bug. I reported this issue to the developers, but they have yet to respond.
Henk Westerbaan

Could not open audio device for playback. with GStreamer on Rapsberry Pi
You can fix this error by explicitly setting the default audio device. For instance, put this:
pcm.!default {

	 type hw

	 card 0

}
ctl.!default {
type hw
card 0
}
in $HOME/.asoundrc
Split ape/flac with cue into oggs on Linux
$ shnsplit -o 'cust ext=ogg oggenc - -o %f' \

  -f CDImage.cue -t "%n.%p - %a - %t" \

  CDImage.ape

$ cuetag CDImage.cue *.ogg
If you’re on Ubuntu, you’ll need to install cuetools and shntool. To split ape, compile and install this port of mac.
Radboud Universiteit Nieuws
De Radboud Universiteit censuurt onder het mom van een duidelijke scheiding tussen intern en extern nieuws sinds kort het niet-meer-onafhankelijke blad de Vox.
Gelukkig kunt u het nieuws alsnog lezen op RU Nieuws. Op deze site wordt al het interne nieuws gelekt.
Bertha: no-nonsense blob storage
For a project I need to store blobs of data (~10MB) and access them over TCP. I don’t need any features like removing, updating, authentication, statistics or replication: it’s simply not required or already handled by some other part of the project.
I only want to be able to store a blob and receive a key for it; retrieve a blob by its key and list all keys of the blobs stored.
I couldn’t find anything that fit it. Thus I created bertha. Lets delve right into it, shall we:
To run the server:
./berthad-vfs 0.0.0.0 1234 tmp data
There’s a python client
>>> from bertha import BerthaClient

>>> c = BerthaClient('serf', 1234)

>>> list(c.list())

[]

>>> key = c.put_str('Hello world')

>>> key

'64ec88ca00b268e5ba1a35678a1b5316d212f4f366b2477232534a8aeca37f3c'

>>> c.get(key).read()

'Hello world'

>>> list(c.list())

['64ec88ca00b268e5ba1a35678a1b5316d212f4f366b2477232534a8aeca37f3c']

>>> ctx = c.put()

>>> ctx.f.write("Do some")

>>> ctx.f.write("Streaming")

>>> ctx.finish()

'975001fb9bdc0f72a78ca6326c55af86348d4c84da7ba47b7ed785a03f6803b0'

>>> c.get('975001fb9bdc0f72a78ca6326c55af86348d4c84da7ba47b7ed785a03f6803b0').read()

'Do someStreaming'
Which also install a bertha commandline tool:
$ bertha list

975001fb9bdc0f72a78ca6326c55af86348d4c84da7ba47b7ed785a03f6803b0

64ec88ca00b268e5ba1a35678a1b5316d212f4f366b2477232534a8aeca37f3c

$ bertha get 975001fb9bdc0f72a78ca6326c55af86348d4c84da7ba47b7ed785a03f6803b0

Do someStreaming

$ echo Hi | bertha put

c01a4cfa25cb895cdd0bb25181ba9c1622e93895a6de6f533a7299f70d6b0cfb

$ bertha get c01a4cfa25cb895cdd0bb25181ba9c1622e93895a6de6f533a7299f70d6b0cfb tmp

$ cat tmp

Hi
The berthad code is pretty small: at the moment under a thousand lines of C with lots of comments. GETs are pretty fast: berthad uses Linux’ splice syscall, which usually makes the network card read directly from the buffer the harddisk wrote to.
Lion display settings refresh-rate bug
When I try to set the displaymode of my external monitor to 1024×768@60 the preferences application doesn’t listen properly and sets it to 1024×768@120, which my monitor does not support. This seems to be a bug in the developer preview.
To remedy this bug, I wrote a simple commandline tool to set displaymodes in Mac OS X. It’s on github.
802.1X configuration profile on Lion (Mac OS X 10.7)
On the developer preview of Lion, the “+” button for 802.1X profiles was removed.
You can use the iPhoneConfigurationUtility application (Google for it) to create a mobile configuration profile with the 802.1X settings, that also imports perfectly fine on Lion.
MacPorts on Lion (Mac OS X 10.7)
Simply install from Subversion.
Thoughts on Flash
I have some remarks on Steve Jobs’s “Thoughts on Flash”.
- “Adobe claims that we are a closed system, and that Flash is open, but in fact the opposite is true.”. I agree with Steve: Flash is pretty closed. However, the iP(hone/od/ad) isn’t open either.
- H.264, which Jobs touts as a great modern replacement of flash, is patented. You have to pay whatever the MPEG LA fancies you to pay for use of the standard. This is not really different from the control of Adobe over Flash.
- iPhone OS is closed. You need to buy yourself into the iPhone Development Program. Again Apple can shut the program down whenever they like, which is not really different from the control of Adobe over Flash development.
- Safari is an intermediate layer and creates sub-standard apps. Jobs claims that third-party intermediate layers result in sub-standard apps. Jobs argues that an intermediate layer will keep developers from platform enhancements, won’t result in targeted great apps and won’t put apps directly on the shoulder of the platform. If he is thinking about Safari, he is right: web-apps for the iPhone just don’t feel great, can’t use all the platform enhancements and don’t result in great targeted apps.
Looking for an apartment
Dear readers,
I’m looking for an apartment in the neighborhood of Nijmegen. I’m not picky, but can’t afford more than €300,- in total per month.
Contact me per e-mail (bas@this domain).
Bas
Update I’m settled!
Dutch student protest
This week, various student organisations protest against major cuts in the funding of education and research.
A reader of dutch, can visit their site.
Unique followers on Twitter
As pointed out by Jorg Kennis, Twitter‘s new lists feature make it hard to determine the amount of unique followers. I’ve written a simple script, using a slightly modified TweePy, to determine the amount of unique followers.
Example usage:
bas@w-nz ~/twitter-unique-followers $ python twitter-unique-followers.py JorgK -ubwesterb

Password:

rate_limit_status: remaining_hits: 112

Jorg Kennis

 followed directly by 182

 in lists

  RPtje/vriendenbekenden subscribed to by 0

  JorgK/TechNL subscribed to by 0

  sentfanwyaerda/nijmegen1 subscribed to by 9

  JorgK/Friends subscribed to by 0

  sjorsjes/Community subscribed to by 0

  robinspeijer/iPhone subscribed to by 1

  nielsschooneman/iPhone subscribed to by 0

  JeanPaulH/iPhoneclub subscribed to by 5

number of unique followers: 198
You can download it here. I could write a simple webpage with the same functionality, if anyone would mind.